Today, Wuxi Rihuan Sensor Technology Co., Ltd.will introduce to you the issue of grating misalignment. There is no need for a laser pointer; just look at the indicator lights will do.
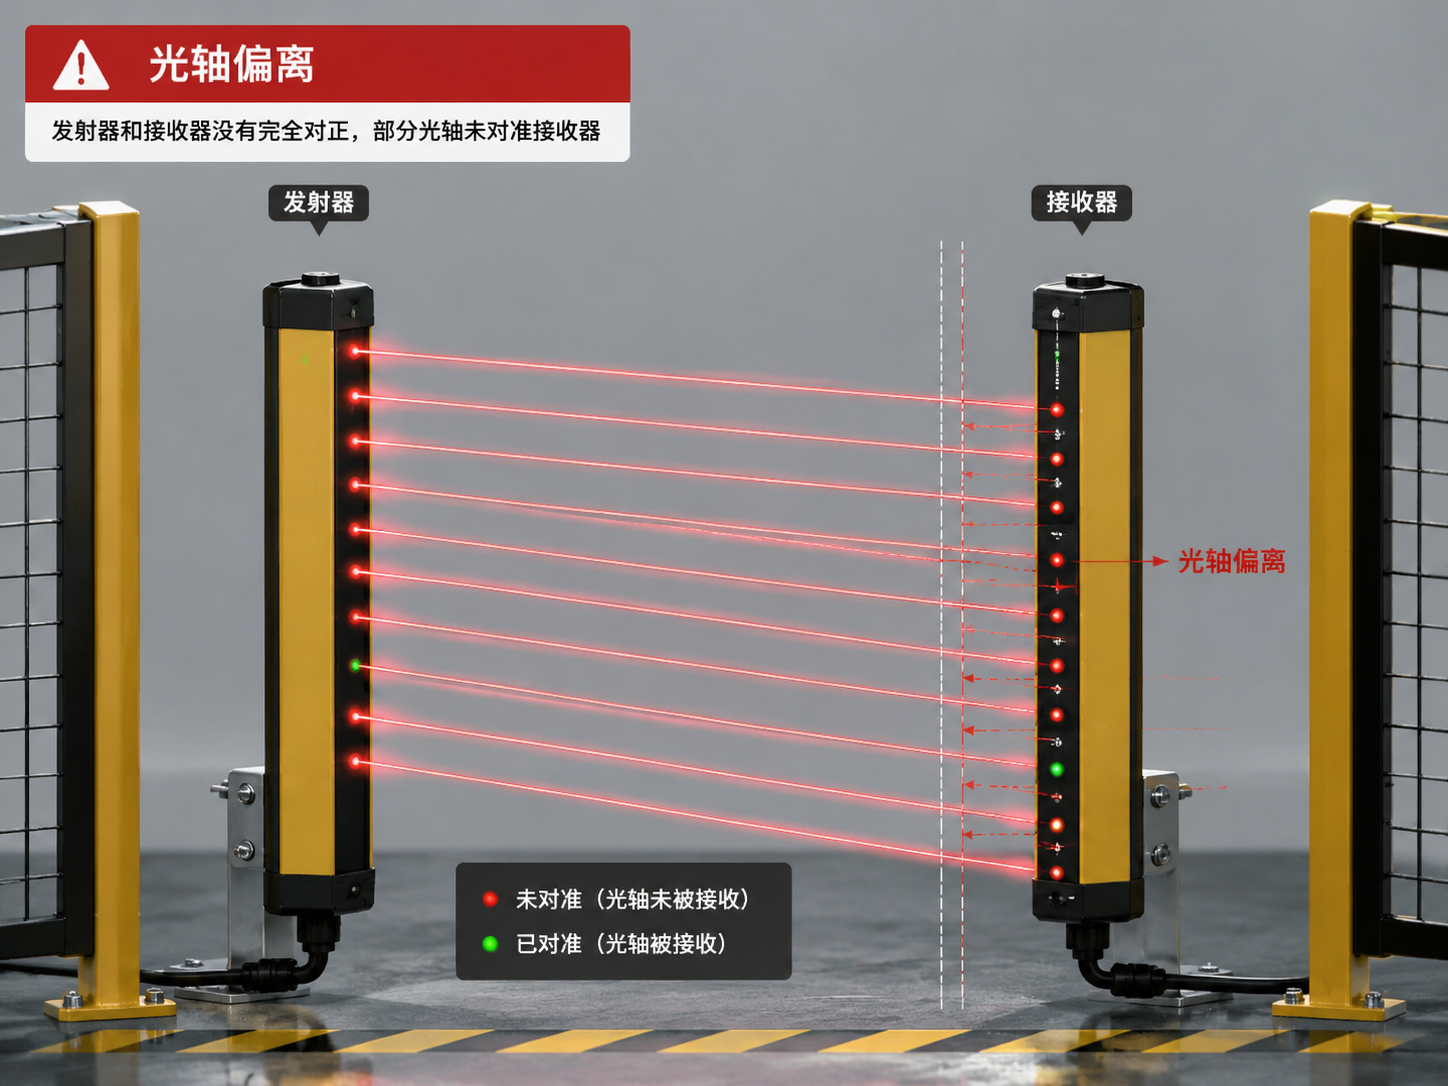
The most common problem encountered with safety grilles in the field is the deviation of the light axis – the transmitter and the receiver are not perfectly aligned, resulting in intermittent signal reception and occasional false alarms from the equipment. Many people's first instinct is to use a laser pointer to assist in alignment. However, most safety grilles can actually tell you the answer on their own. The key lies in the alignment indicator light on the receiver.
What is the indicator light saying?
The alignment indicator light on the receiver, which is the "alignment dashboard" of the grating. The design of the indicator lights for different brands of gratings may vary slightly, but the logic is basically the same:
Axis alignment is perfect: The indicator lights are all on (usually green), indicating that all the beams are receiving normally.
Slightly off: The indicator light starts to flash, or some areas light up while others remain dark. This indicates that the signal received by some of the light beams is relatively weak.
Significantly off-target: The indicator light goes out or shows a red light, indicating that most of the light beam has been lost.
Some grating devices are also equipped with multi-stage alignment indicator lights, which divide the light curtain into several sections from top to bottom and display them separately - which section is lit up and which is not, making it very clear which direction to adjust.
No need for a laser pointer, nor any additional tools. Just look at the indicator lights will do.
Two-step method: coarse adjustment + fine adjustment
Step 1: Coarse adjustment
The transmitter and receiver are roughly at the same height and oriented parallel to each other. Fix the transmitter and receiver on the brackets respectively. Do not fully tighten the screws of the brackets at first, leaving some adjustment room. After powering on, observe the indicator light of the receiver to determine the direction of the deviation.
Step 2: Fine-tuning
On the basis of the coarse adjustment, make fine adjustments to the position of the receiver (and also fine-tune the transmitter if necessary). While adjusting, observe the alignment indicator light on the receiver - when the indicator light is at its brightest, most stable, and does not flicker, that is the optimal alignment state.
When fine-tuning, be sure to make each adjustment in small increments; don't make too many changes at once. After alignment is completed, secure the bracket screws.
After adjustment, install anti-vibration brackets.
Many photogates were functioning properly when initially set up. However, after being used for several months, they began to intermittently give false alarms. The fundamental cause was the vibration generated by the long-term operation of the equipment. Gradually, this vibration caused the brackets to shift. Even a deviation of only 3° could lead to the displacement of the optical axis and unstable signals.
The solution is to install anti-vibration brackets or shock-absorbing pads during the installation process. The anti-vibration brackets can firmly fix the position of the grating and effectively resist the displacement caused by equipment vibration - once installed, it will work for three years. For equipment with particularly high vibration levels such as stamping and bending, it is also advisable to consider using dedicated brackets with shock absorbers.
The safety grating products of Rihuan Sensor are equipped with a clear alignment indicator system and are provided with installation accessories such as anti-vibration brackets, helping users quickly align the light and maintain stability for a long time. Welcome to follow Rihuan Sensor to obtain professional installation guidance and technical support.